Imagine the irresistible sizzle and the rich aroma of a perfectly seared steak, boasting a deep, caramelized crust and a juicy, tender interior. Many home cooks dream of achieving restaurant-quality steak but assume it requires a traditional stovetop or an outdoor grill. However, your electric skillet is a surprisingly powerful tool for mastering the art of searing steak, offering precision and convenience right in your kitchen. This comprehensive guide will transform your electric skillet into a steak-searing powerhouse, ensuring every bite is a culinary delight.
What is an Electric Skillet?
An electric skillet is a versatile countertop appliance, essentially a frying pan with its own built-in heating element and thermostat, designed to cook a wide array of dishes. Unlike traditional skillets that rely on a stovetop burner, electric skillets offer consistent and adjustable heat directly to the cooking surface. This self-contained unit typically includes a non-stick surface, a lid, and a control probe to set and maintain precise temperatures, making it a popular choice for everything from everyday meals to holiday feasts.
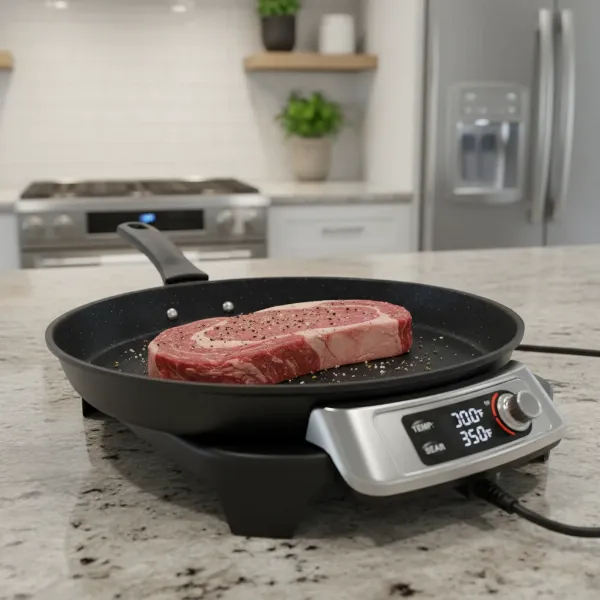 Electric skillet cooking steak with precise temperature control.
Advantages and Disadvantages of Using an Electric Skillet for Steak
While often overlooked for steak, electric skillets bring unique benefits and a few considerations to the table for aspiring grill masters.
Advantages
- Precise Temperature Control: Electric skillets excel at maintaining a consistent temperature, which is crucial for searing steak evenly and preventing burnt spots [cite: 1_search_results_1, 1_search_results_5]. Most models allow you to dial in an exact temperature, often ranging from 200°F to 400°F or even 450°F, giving you greater control over the searing process than a typical stovetop burner.
- Even Heat Distribution: Thanks to their integrated heating elements, electric skillets typically distribute heat more uniformly across the cooking surface, reducing hot spots that can lead to uneven cooking [cite: 2_search_results_1]. This evenness helps create a consistent, golden-brown crust on your steak.
- Convenience and Portability: An electric skillet’s independent operation means you can cook steak virtually anywhere there’s an electrical outlet—perfect for small kitchens, dorm rooms, or even outdoor cooking where a grill isn’t available. They also free up valuable stovetop space.
- Easier Cleanup: Many electric skillets feature non-stick coatings, which make cleaning up after cooking a breeze. The entire unit, once the control probe is removed, is often submersible or dishwasher-safe.
|
Our Picks for the Best Electric skillet in 2026
As an Amazon Associate I earn from qualifying purchases.
|
||
| Num | Product | Action |
|---|---|---|
| 1 | Elite Gourmet EG-6203# Extra Deep 16"x13"x3.2" (10.5Qt.) Scratch Resistant, Easy Pour Spout Dishwasher Safe, Non-stick Electric Skillet with Glass Vented Lid, Adjustable Temperature, Black |

|
| 2 | bella Make & Take Electric Skillet, Fits-anywhere™ kitchenware, EverGood™ Ceramic Coating, Adjustable Temperature & Dishwasher-Safe Tempered Glass Lid, Cast Aluminum Base, 1200 Watt, Oatmilk |
|
| 3 | Nuwave Medley XL Digital Electric Skillet, Family Size Griddle w/Glass Lid, 2025 New & Improved Precision Heating, 100°-425°F, PFAS Free G11 Nonstick Ceramic Coating, Portable Hot Plate, 7qt Capacity |
|
| 4 | Elite Gourmet 12"x12"x2.15” Ceralast™ PFAS Free Ceramic Electric Skillet, Dishwasher Safe, Rapid Heat Up, 1200W, Dark Grey |
|
| 5 | Elite Gourmet EG6201 Extra Deep 12"x12"x3.2" (7.5Qt.) Scratch Resistant Dishwasher Safe, Non-stick Electric Skillet with Glass Vented Lid, Adjustable Temperature, Black |
|
| 6 | FOHERE 16-Inch Electric Skillet with Glass Cover, 1500W Rapid Heat, Adjustable Temperature, Multi-Purpose Electric Skillet Fried Chicken, Perfect For Family Gathering Cooking |
|
| 7 | Blue Diamond 7QT 5-in-1 Extra Large Electric Skillet, Healthy Ceramic Nonstick Interior, Non-Toxic PFAS-Free, Temperature Control, Stay Cool Handles, Easy Clean, Graphite |
|
| 8 | Elite Gourmet EG808 8” x 8" Non-stick Electric Skillet, Dishwasher Safe with Tempered Glass Vented Lid, Rapid Heat Up, 600W, Black |
|
| 9 | Presto 06857 16-inch Electric Foldaway Skillet, Black |
|
| 10 | Pioneer Woman 3.5L Electric Skillet, Linen Speckle |
|
Disadvantages
- Maximum Temperature Limits: Some electric skillets might not reach the “smoking hot” temperatures that a high-powered gas burner can achieve with a heavy cast-iron pan, potentially limiting the intensity of the sear on thicker steaks [cite: 2_search_results_2, 2_search_results_5]. While many reach 400°F or higher, a truly blazing heat can sometimes be harder to sustain.
- Size Limitations: While many electric skillets are generously sized, they can still be limiting if you’re cooking multiple large steaks simultaneously. Overcrowding the pan can lower the surface temperature, hindering the searing process.
- Requires Power Outlet: Unlike a traditional pan that works on any heat source, an electric skillet is always tethered to an electrical outlet, which might restrict placement options in some kitchens.
Choosing the Right Steak for Your Electric Skillet
The secret to a fantastic electric skillet steak begins with selecting the ideal cut. Not all steaks are created equal when it comes to pan-searing.
Best Cuts for Searing
For optimal results in an electric skillet, opt for cuts known for their tenderness and marbling. These include:
- Ribeye: Celebrated for its rich marbling, the ribeye steak renders beautifully, creating incredible flavor and a juicy, tender interior [cite: 3_search_results_3, 3_search_results_2].
- New York Strip: A lean yet tender cut, the New York strip boasts a robust beefy flavor and sears beautifully, developing a crisp crust [cite: 3_search_results_2, 3_search_results_5].
- Filet Mignon (Tenderloin): Known as the most tender cut, filet mignon offers a delicate texture. Pan-searing creates a lovely crust while preserving its melt-in-your-mouth tenderness [cite: 3_search_results_2].
- Sirloin: A versatile and flavorful cut, sirloin is a good choice for those seeking quality without the higher price point of a ribeye or filet [cite: 3_search_results_1, 3_search_results_2].
- Flat Iron Steak: This flavorful and tender cut from the shoulder is a great value option that sears well and remains tender when cooked to medium-rare or medium [cite: 3_search_results_2].
Thickness Matters
The thickness of your steak plays a crucial role in achieving that coveted crust and juicy interior. Aim for steaks that are 1 to 1.5 inches thick. Thicker cuts allow enough time for a beautiful sear to develop on the outside without overcooking the inside [cite: 2_search_results_2]. Thin steaks (under an inch) can quickly overcook before a proper crust forms.
Essential Prep Steps for a Perfect Electric Skillet Steak
Proper preparation is just as important as the cooking itself. These steps ensure your steak is ready to achieve that perfect sear.
- Bring to Room Temperature: Remove your steak from the refrigerator 20 to 30 minutes before cooking. Allowing the meat to come to room temperature helps it cook more evenly from edge to center [cite: 2_search_results_2, 2_search_results_4].
- Pat Dry Thoroughly: This is a non-negotiable step for a superior sear. Use paper towels to vigorously pat both sides of the steak completely dry. Any surface moisture will steam rather than sear, preventing the Maillard reaction (the chemical reaction that gives seared food its distinctive flavor and brown crust) from occurring effectively [cite: 4_search_results_4, 2_search_results_2].
- Season Generously: Simplicity often works best. Season both sides of your steak generously with kosher salt and freshly ground black pepper. For added depth, consider garlic powder or fresh herbs like rosemary or thyme [cite: 1, 1_search_results_5, 2_search_results_2]. Apply seasoning just before cooking or allow it to sit for 45 minutes to draw out moisture and then re-absorb flavor, resulting in a well-seasoned, dry surface [cite: 4_search_results_4].
- Choose the Right Oil: Select a high smoke point oil that can withstand the intense heat required for searing. Avocado oil, canola oil, grapeseed oil, or vegetable oil are excellent choices. Avoid extra virgin olive oil, as its low smoke point can cause it to burn and impart a bitter taste [cite: 2_search_results_5, 4_search_results_4].
The Searing Guide: Cooking Steak in an Electric Skillet
Now, let’s dive into the exciting part: cooking your steak to perfection in an electric skillet.
Preheat the Skillet to Perfection
Achieving a good sear starts with a screaming hot pan.
- Set the Temperature: Turn your electric skillet to its highest setting, typically between 375°F to 400°F, and allow it to preheat fully [cite: 1_search_results_1, 1_search_results_2, 1_search_results_3, 1_search_results_5]. Some skillets may even go up to 450°F. This usually takes about 5-10 minutes.
- Test for Readiness: A simple test confirms your skillet is hot enough: sprinkle a few drops of water onto the surface. If they sizzle and evaporate quickly, you’re ready to cook [cite: 1_search_results_1, 2_search_results_2].
- Add Oil: Just before placing the steak, add a thin layer of your chosen high smoke point oil to the hot skillet. It should shimmer, indicating it’s ready for action [cite: 1_search_results_5, 4_search_results_3].
Searing for the Golden Crust
This is where the magic happens – developing that irresistible crust.
- Place the Steak: Gently place your seasoned steak into the hot skillet. You should hear an immediate, satisfying sizzle. Avoid overcrowding the pan; cook one or two steaks at a time, ensuring at least an inch of space around each piece to maintain skillet temperature [cite: 1_search_results_5, 2_search_results_2, 4_search_results_3].
- Initial Sear: For the first side, resist the urge to move the steak for 2 to 3 minutes. This crucial time allows a deep, flavorful crust to form [cite: 3_search_results_3, 4_search_results_3].
- Flip and Continue Searing: Flip the steak to the other side. Some chefs advocate flipping every 15-30 seconds after the initial sear to develop an even crust and minimize the gray band beneath the surface [cite: 3_search_results_3]. Others prefer a single flip after 1-2 minutes per side for the initial browning [cite: 1, 2_search_results_1]. Both methods can yield excellent results; experiment to find what works best for you. Continue searing until both sides are deeply browned.
Finishing to Your Desired Doneness
After achieving a beautiful sear, it’s time to cook the steak through.
- Reduce Heat: Once a good crust has formed on both sides, reduce the electric skillet’s temperature to medium-low, typically around 250°F-275°F [cite: 1, 2_search_results_3].
- Cover (Optional): If your electric skillet has a lid, you can place it on to help cook the steak through more evenly, especially for thicker cuts [cite: 2_search_results_1].
- Monitor Internal Temperature: The most accurate way to determine doneness is with an instant-read meat thermometer inserted into the thickest part of the steak, avoiding any bone.
- Rare: 120-125°F (remove at 115-120°F)
- Medium-Rare: 130-135°F (remove at 125-130°F) [cite: 1_search_results_5, 2_search_results_2]
- Medium: 140-145°F (remove at 135-140°F) [cite: 1, 2_search_results_3]
- Medium-Well: 150-155°F (remove at 145-150°F) [cite: 1, 2_search_results_3]
- Well Done: 160°F and above (remove at 155-160°F) [cite: 1, 2_search_results_3]
- Remember, the steak’s internal temperature will rise by 5-10°F during resting.
Basting for Extra Flavor (Optional)
For an added layer of richness and aroma, consider basting your steak during the last few minutes of cooking.
- Add Flavor Enhancers: Introduce a tablespoon or two of butter, smashed garlic cloves, and fresh herbs like rosemary or thyme to the skillet [cite: 1_search_results_5, 4_search_results_1, 2_search_results_2].
- Baste: As the butter melts and the herbs infuse, tilt the skillet slightly and use a spoon to continuously baste the melted butter and herb mixture over the steak. This technique helps build flavor and keeps the steak moist.
The Crucial Resting Period
Once your steak reaches its target internal temperature, remove it from the electric skillet immediately.
- Tent with Foil: Transfer the steak to a cutting board and tent it loosely with aluminum foil [cite: 1_search_results_5, 4_search_results_4].
- Rest: Allow the steak to rest for 5 to 10 minutes before slicing. This essential step allows the juices, which have been pushed to the center of the steak by the heat, to redistribute evenly throughout the meat. Slicing too early will result in a dry steak, as all those delicious juices will simply run out onto your cutting board [cite: 1_search_results_5, 2_search_results_2, 4_search_results_4].
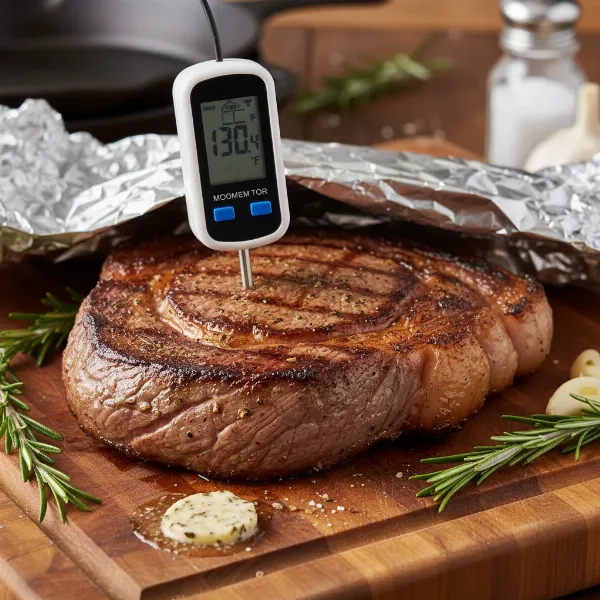 A perfectly seared medium-rare steak resting on a cutting board.
Tips for Achieving the Best Sear
Mastering the perfect sear in an electric skillet involves attention to detail and a bit of practice.
- Don’t Overcrowd the Pan: This cannot be stressed enough. Overcrowding lowers the skillet’s temperature, leading to steaming instead of searing [cite: 4_search_results_4, 2_search_results_2]. If cooking for a crowd, work in batches.
- Ensure Steak is Bone Dry: Patting your steak thoroughly dry is paramount. Moisture inhibits the Maillard reaction, preventing that desirable crust from forming [cite: 4_search_results_4, 2_search_results_2].
- Patience is Key: Resist the urge to constantly poke or move the steak. Let it sit undisturbed on each side during the initial sear to develop a solid crust [cite: 1_search_results_5, 4_search_results_3]. It will naturally release from the pan when it’s ready to flip.
- Consider a Reverse Sear for Thick Steaks: For very thick cuts (over 1.5 inches), you might consider a reverse sear. This involves slowly cooking the steak in a low oven first until it’s just shy of your desired doneness, then finishing it with a quick, high-heat sear in the electric skillet [cite: 4_search_results_4]. This method ensures even cooking throughout and a fantastic crust.
Conclusion
Cooking steak in an electric skillet is not only convenient but also an excellent way to achieve a beautifully seared, juicy, and flavorful steak right in your own kitchen. By understanding your electric skillet’s capabilities, selecting the right cut, performing meticulous preparation, and mastering the searing and resting techniques, you can consistently create restaurant-quality results. Don’t underestimate the power of this humble appliance! So, grab your favorite cut, fire up your electric skillet, and prepare to impress your taste buds. What’s your go-to side dish for a perfectly seared steak?
Frequently Asked Questions
What oil is best for searing steak in an electric skillet?
For searing steak at high temperatures, always choose an oil with a high smoke point. Excellent options include avocado oil, canola oil, grapeseed oil, or vegetable oil. These oils can withstand the heat without burning and imparting off-flavors to your steak.
How do I know when my electric skillet is hot enough for searing?
To check if your electric skillet has reached the optimal searing temperature (around 375-400°F), sprinkle a few drops of water onto the surface. If the water sizzles vigorously and evaporates almost instantly, your skillet is ready for the steak.
How do I prevent my steak from sticking to the electric skillet?
Ensure your electric skillet is properly preheated to a high temperature and that you’ve added a high smoke point oil that is shimmering before adding the steak. Also, avoid moving the steak too soon; a good crust will naturally release from the pan when it’s ready to be flipped.
Can I cook thick steaks in an electric skillet?
Yes, you absolutely can cook thick steaks (1 to 1.5 inches) in an electric skillet. The key is to achieve a strong initial sear on high heat, then reduce the temperature and potentially cover the skillet to allow the steak to cook through to your desired doneness without burning the exterior.
Why is resting the steak so important after cooking?
Resting the steak for 5-10 minutes after cooking allows the muscle fibers to relax and the juices, which concentrate in the center during cooking, to redistribute throughout the meat. This results in a more tender, flavorful, and juicy steak when you slice into it.