A wobbly handle on your electric skillet isn’t just an annoyance; it’s a safety hazard that can lead to spills, burns, or even damage to your favorite appliance. After years of reliable service, even the best electric skillets can develop this common issue due to constant use, heat exposure, and general wear and tear. Fortunately, a loose handle doesn’t mean your skillet is destined for the scrap heap. With a few simple tools and a bit of know-how, you can easily repair it yourself, restoring stability and safety to your cooking routine. This comprehensive guide will walk you through the process, from identifying the type of handle attachment to step-by-step repair instructions and essential maintenance tips.
What Causes a Loose Electric Skillet Handle?
Electric skillet handles become loose for a variety of reasons, primarily stemming from the stresses of regular cooking. Over time, the repeated heating and cooling cycles can cause the metal components to expand and contract, gradually loosening the fasteners that secure the handle to the skillet body. Frequent lifting, stirring, and moving the skillet also exert continuous force on the handle, contributing to wear on screws or rivets. Sometimes, manufacturing tolerances or impacts from accidental drops can also play a role in developing a wobble. Understanding these root causes highlights why even a well-built electric skillet might eventually need a handle tune-up.
Tools You’ll Need for the Repair
Before you begin the repair process, gather the necessary tools. Having everything at hand will make the job smoother and more efficient. The specific tools may vary slightly depending on your skillet’s handle design, but generally, you’ll need:
- Screwdrivers: A set including Philips-head, flathead, and potentially Torx-head screwdrivers to match various screw types.
- Small Wrench or Pliers: Useful for tightening nuts or holding bolts in place.
- Hammer: Essential for re-compressing rivets if your handle is riveted.
- Punch (Optional): A metal punch can be used with a hammer for rivet repair, or a shoe last for stability.
- Drill (Optional): Only if rivets need to be drilled out and replaced with screws.
- New Screws/Nuts (Optional): If existing fasteners are stripped or missing.
- Safety Glasses: Always recommended when working with tools, especially if hammering or drilling.
- Cleaning Cloth/Brush: For cleaning any debris or rust from the attachment points.
Identifying Your Electric Skillet Handle Type
The first critical step in repairing a loose handle is to determine how it’s attached to the skillet. Electric skillet handles are typically secured in one of two ways: with screws or with rivets.
- Screwed Handles: These are the most common and easiest to fix. You’ll usually see visible screw heads either on the exterior of the handle, underneath the handle where it meets the pan, or sometimes hidden beneath a small cap or a detachable part of the handle itself. The screws often pass through the handle and into a bracket on the skillet body.
- Riveted Handles: Rivets are permanent fasteners that look like small, smooth metal studs protruding through the handle and pan. There are no screw heads to turn. This method is often found on older or heavy-duty skillets. Repairing a riveted handle involves re-compressing the rivets rather than tightening them.
Carefully examine your electric skillet’s handle to identify the attachment method before proceeding to the repair steps.
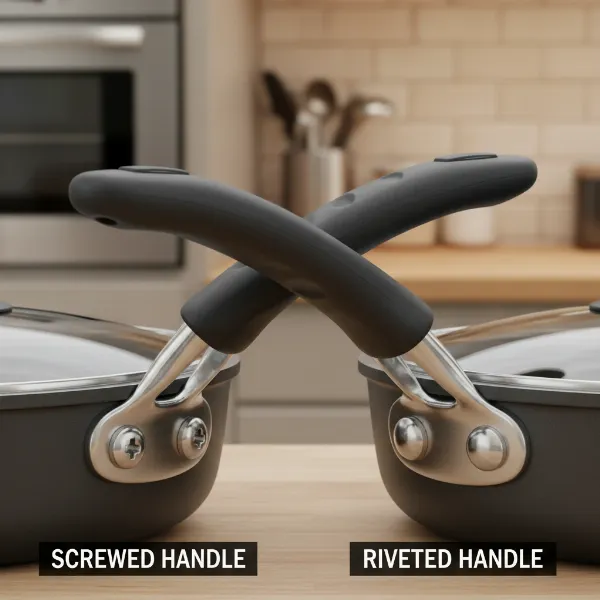 Close-up of electric skillet handles, showing both screwed and riveted attachment methods clearly.
Step-by-Step Guide to Repairing a Screwed Electric Skillet Handle
If your electric skillet handle is secured with screws, this is usually a straightforward fix.
- Safety First: Ensure your electric skillet is completely unplugged and cool to the touch. Never attempt repairs on a hot or plugged-in appliance.
- Locate the Screws: Examine the handle and where it attaches to the skillet. Screws might be visible on the top, bottom, or sides of the handle. Some handles have a decorative cap or a removable section that needs to be slid off or gently pried open to reveal the screws underneath.
- Clean the Area: Use a small brush or cloth to remove any accumulated grease, food debris, or rust from around the screw heads. This ensures a better grip for your screwdriver.
- Choose the Right Screwdriver: Select a screwdriver that perfectly fits the head of the screw. Using the wrong size can strip the screw, making it much harder to tighten or remove.
- Tighten the Screws: Turn the screwdriver clockwise to tighten the screws. Apply firm, steady pressure. If a screw feels stuck or difficult to turn, try loosening it a tiny bit first (turn counter-clockwise) before tightening. This can break any rust or crud that’s binding it. Tighten each screw securely, but avoid over-tightening, which could strip the screw threads or crack the handle material.
- Check for Stability: Once all screws are tightened, gently wiggle the handle to ensure it is firm and stable.
- Reassemble (If Necessary): If you removed any caps or handle sections to access the screws, carefully put them back in place.
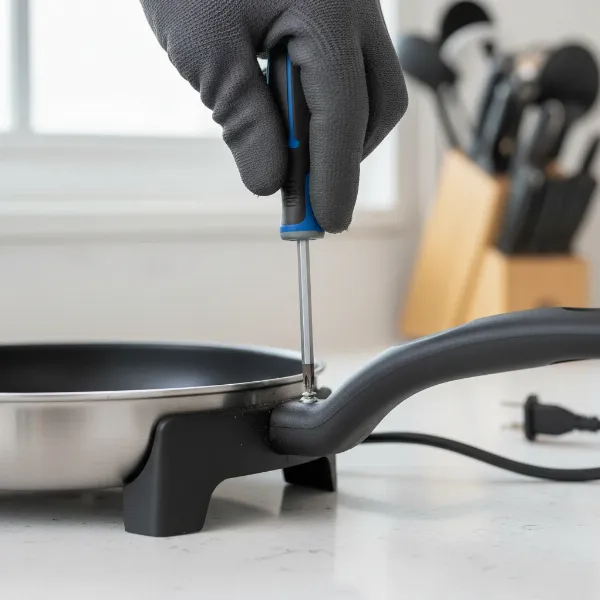 Hand using a screwdriver to tighten a loose screw on an electric skillet handle for stability.
Step-by-Step Guide to Repairing a Riveted Electric Skillet Handle
Repairing a riveted handle is a bit more involved than tightening screws, as rivets are designed to be permanent. However, with the right approach, a loose riveted handle can often be remedied.
- Safety First: As always, ensure the skillet is unplugged and completely cool.
- Understand Rivet Loosening: Rivets typically loosen due to the metal expanding and contracting with heat, causing the compressed ends to spread slightly. The goal is to re-compress these ends.
- Method 1: Re-compressing Rivets
- Stabilize the Skillet: Place the skillet on a sturdy, flat, and hard surface (like a concrete floor, anvil, or heavy workbench). You might need to place the skillet upside down or on its side to get good access to the rivets. If you have a shoe last or a similar curved metal object, placing it under the skillet where the rivets are can provide excellent support.
- Position the Punch: Place the tip of a metal punch directly over the head of one rivet. The punch should be slightly smaller than the rivet head.
- Hammer Gently: Using a hammer, tap the end of the punch firmly but gently. The goal is to slightly flatten and expand the rivet head, drawing the handle tighter against the skillet. Work your way around the edges of the rivet head.
- Repeat and Check: Repeat this process for all loose rivets, periodically checking the handle’s stability. Be patient and use controlled taps rather than forceful blows to avoid damaging the skillet or handle.
- Method 2: Drilling Out and Replacing (Advanced/Last Resort)
- If re-compressing doesn’t work or the rivets are severely damaged, you might need to drill them out. This is a more permanent and advanced solution.
- Drill Out Rivets: Using a metal drill bit slightly larger than the rivet shaft, carefully drill through the center of each rivet head until it detaches. Be extremely cautious and wear safety glasses.
- Replace with Screws and Nuts: Once the rivets are removed, you can replace them with appropriately sized stainless steel machine screws, washers, and nuts. Insert the screws from the inside of the skillet, pass them through the handle, add a washer, and then tighten with a nut. This effectively converts your riveted handle into a screwed one.
“A wobbly handle on any cookware signals it’s time for a quick inspection. Addressing it promptly not only improves your cooking experience but, more importantly, prevents potential kitchen accidents.” – Chef Anya Sharma, Culinary Safety Expert
When to Consider Professional Repair or Replacement
While many loose handle issues are DIY-friendly, there are times when it’s safer and more practical to seek professional help or consider replacing your electric skillet.
- Cracked or Broken Handle: If the handle material itself is cracked, fractured, or has parts missing, a simple tightening won’t suffice. This can be dangerous as the handle might completely break during use.
- Irreparable Rivet Damage: If rivets are severely corroded, broken, or if repeated attempts to re-compress them fail, and you’re uncomfortable with drilling them out, professional repair or replacement is advisable.
- Exposed Electrical Components: If the handle’s loosening or damage has exposed any electrical wiring or internal components of the electric skillet, do not attempt to repair it yourself. This poses a severe electrical shock risk. Immediately unplug the skillet and consult a qualified technician or replace the unit.
- Persistent Looseness: If you’ve tightened screws or attempted rivet repair, and the handle quickly becomes loose again, there might be a deeper structural issue that’s best left to experts or warrants a new appliance.
Your safety is paramount. When in doubt, always err on the side of caution.
Maintaining Your Electric Skillet Handle to Prevent Loosening
Preventative maintenance can significantly extend the life of your electric skillet handle and reduce the likelihood of it becoming loose.
- Regular Checks: Periodically (e.g., monthly) give your handle a gentle wiggle. If you feel any movement, address it immediately by tightening screws before it becomes a significant issue.
- Gentle Handling: Avoid banging the skillet or dropping it, which can stress the handle’s attachment points.
- Proper Storage: Store your electric skillet in a way that doesn’t put undue pressure on the handle. Avoid stacking heavy items directly on the handle.
- Avoid Extreme Temperature Changes: While electric skillets are designed for heat, rapid changes in temperature (e.g., plunging a hot skillet into cold water) can cause materials to expand and contract aggressively, potentially weakening fasteners over time. Allow the skillet to cool naturally before cleaning.
- Thorough Cleaning: Keep the area where the handle attaches clean and free of baked-on food or grease. This prevents corrosive buildup that can damage screws or rivets.
Conclusion
A loose handle on your electric skillet can be a frustrating and potentially hazardous problem, but as we’ve seen, it’s often a simple fix that doesn’t require specialized skills. By understanding the common causes, having the right tools, and following our step-by-step guides for both screwed and riveted handles, you can quickly restore your skillet to safe, optimal working condition. Regular maintenance and a watchful eye will ensure your electric skillet remains a reliable kitchen companion for years to come. Don’t let a minor wobble derail your culinary adventures—take charge and fix it! What’s your favorite dish to prepare in a perfectly stable electric skillet?
Frequently Asked Questions
How often should I check my electric skillet handle for looseness?
|
Our Picks for the Best Electric skillet in 2026
As an Amazon Associate I earn from qualifying purchases.
|
||
| Num | Product | Action |
|---|---|---|
| 1 | Elite Gourmet 12"x12"x2.15” Ceralast™ PFAS Free Ceramic Electric Skillet, Dishwasher Safe, Rapid Heat Up, 1200W, Dark Grey |

|
| 2 | Elite Gourmet EG-6203# Extra Deep 16"x13"x3.2" (10.5Qt.) Scratch Resistant, Easy Pour Spout Dishwasher Safe, Non-stick Electric Skillet with Glass Vented Lid, Adjustable Temperature, Black |
|
| 3 | FOHERE 16-Inch Electric Skillet with Glass Cover, 1500W Rapid Heat, Adjustable Temperature, Multi-Purpose Electric Skillet Fried Chicken, Perfect For Family Gathering Cooking |
|
| 4 | Pioneer Woman 3.5L Electric Skillet, Linen Speckle |
|
| 5 | Elite Gourmet EG808 8” x 8" Non-stick Electric Skillet, Dishwasher Safe with Tempered Glass Vented Lid, Rapid Heat Up, 600W, Black |
|
| 6 | Nuwave Medley XL Digital Electric Skillet, Family Size Griddle w/Glass Lid, 2025 New & Improved Precision Heating, 100°-425°F, PFAS Free G11 Nonstick Ceramic Coating, Portable Hot Plate, 7qt Capacity |
|
| 7 | Blue Diamond 7QT 5-in-1 Extra Large Electric Skillet, Healthy Ceramic Nonstick Interior, Non-Toxic PFAS-Free, Temperature Control, Stay Cool Handles, Easy Clean, Graphite |
|
| 8 | Elite Gourmet EG6201 Extra Deep 12"x12"x3.2" (7.5Qt.) Scratch Resistant Dishwasher Safe, Non-stick Electric Skillet with Glass Vented Lid, Adjustable Temperature, Black |
|
| 9 | Presto 06857 16-inch Electric Foldaway Skillet, Black |
|
| 10 | bella Make & Take Electric Skillet, Fits-anywhere™ kitchenware, EverGood™ Ceramic Coating, Adjustable Temperature & Dishwasher-Safe Tempered Glass Lid, Cast Aluminum Base, 1200 Watt, Oatmilk |
|
It’s a good practice to check your electric skillet handle for any looseness or wobble about once a month, or whenever you notice a slight movement during use. Early detection allows for a quick and easy fix, preventing the issue from worsening and becoming a safety concern.
Can I use super glue to fix a loose electric skillet handle?
No, it is not recommended to use super glue or any adhesive to fix a loose electric skillet handle. Adhesives are unlikely to withstand the high temperatures and stresses of cooking, and they can also make proper repair or disassembly impossible in the future. Always use mechanical fasteners like screws or rivets for a secure and safe fix.
What if my electric skillet handle is made of plastic and it’s cracked?
If your electric skillet handle, especially if made of plastic, is cracked or broken, it’s generally best to replace the entire handle or, if a replacement handle isn’t available, consider replacing the skillet itself. A cracked handle compromises safety and cannot be reliably repaired with tightening or re-compression.
Is it safe to use an electric skillet with a slightly wobbly handle?
Even a slightly wobbly handle can be dangerous as it can lead to accidental spills, burns, or dropping the hot skillet and its contents. For safety, it’s always recommended to repair or replace a loose handle on your electric skillet before using it for cooking.
Where can I find replacement screws or rivets for my electric skillet handle?
For replacement screws or rivets, first check your electric skillet’s manufacturer website or contact their customer service. They might offer specific replacement parts. Alternatively, you can often find suitable universal replacement hardware at a well-stocked hardware store, matching the size and thread of the original fasteners.